Breakfast & Brunch
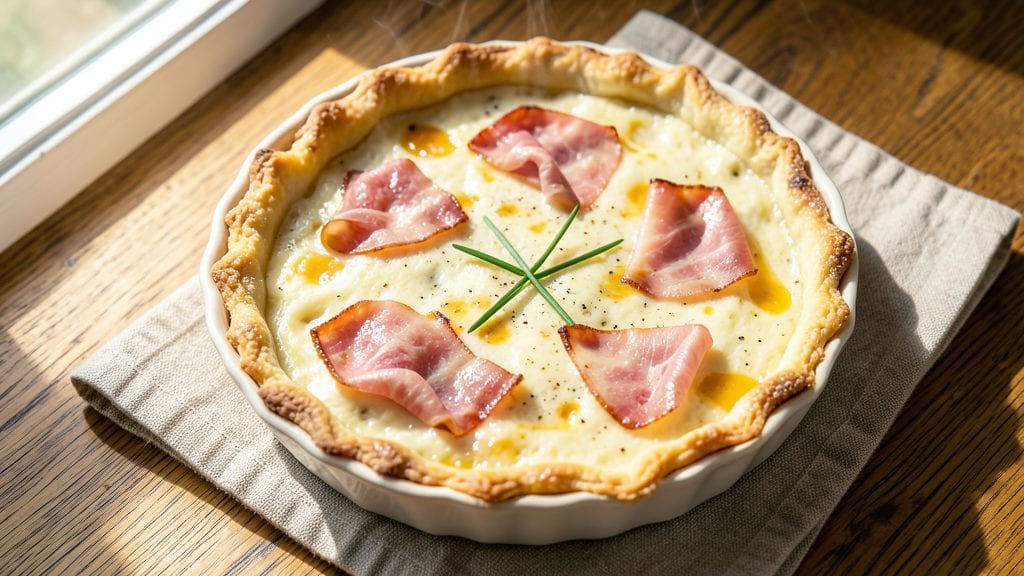
A basic ham and cheese quiche recipe delivers the perfect balance of flaky crust and rich, savory egg custard—ideal for breakfast or brunch. The secret lies in a well-baked crust that holds its shape while the custard sets to a velvety finish.
I developed this version after testing countless methods, ensuring every bite delivers that satisfying combination of crisp edges and creamy filling.
This recipe builds on classic techniques with a few professional touches: a pre-baked crust prevents sogginess, while a simple ham and cheese filling keeps prep straightforward. The egg mixture requires just 10 minutes of whisking, and baking at 375°F ensures a golden, perfectly set center.
No special equipment is needed—just a pie dish and basic pantry staples.
What you'll achieve is a quiche with a flaky, buttery crust that shatters slightly when cut, paired with a custard so smooth it melts on your tongue. The ham adds salty depth, while sharp cheddar creates pockets of gooey goodness in every slice.
Serve warm with a side salad or crusty bread for a complete meal.
Whether you're hosting a brunch or prepping for the week, this quiche delivers restaurant-quality results without the fuss. The recipe scales easily, and leftovers reheat beautifully. Here's how to create it from start to finish—no shortcuts, just proven techniques for foolproof success.
Ingredients for basic ham and cheese quiche
Here's what you need for that perfect golden crust and velvety custard—no fancy ingredients, just good stuff.
| Ingredient | Amount | Notes |
|---|---|---|
| All-Purpose Flour 🌾 | 2 ½ cups | For sturdy crust foundation |
| Unsalted Butter 🧈 | 1 cup | Cold, cubed for flaky texture |
| Ice Water 💧 | ½ cup | Essential for pie crust |
| Large Eggs 🥚 | 5 whole | Room temperature preferred |
| Heavy Whipping Cream 🥛 | 1 cup | Full-fat for rich custard |
| Milk 🥛 | ½ cup | Whole milk for creaminess |
| Sharp Cheddar Cheese 🧀 | 1 ½ cups | Shredded, not pre-shredded |
| Diced Ham 🥓 | 1 cup | Low-sodium preferred |
| Salt 🧂 | 1 tsp | Kosher or sea salt |
| Black Pepper 🌶️ | ½ tsp | Freshly ground preferred |
| Garlic Powder 🧄 | ½ tsp | For subtle depth |
| Nutmeg 🌿 | ¼ tsp | Freshly grated for warmth |
The crust starts with cold butter—never soften it. Kirkland Signature or Plugrá are my go-tos for that buttery flavor without the salt. Flour matters too: King Arthur or Gold Medal give the best structure. If you're short on time, pre-made pie crust works (just blind-bake it first). For the ham, grab low-sodium if you're watching salt—it keeps the filling balanced. The cheddar? Sharp, aged cheddar melts best; skip the pre-shredded stuff unless it says 'block-style' on the bag.
No heavy cream? Whole milk plus 2 tbsp melted butter gets you close. Fresh nutmeg is ideal, but ground works at half the amount. If you've got Gruyère or Swiss instead of cheddar, go for it—just reduce by a quarter cup. The eggs need to be room temp, but if they're cold, let them sit out for 30 minutes. For the crust, if you don't have ice water, freeze a cup of water and add it gradually—it's the same thing. And if you're making a double batch, use two 9-inch dishes instead of one 12-inch.
This keeps 3 days in the fridge, but honestly? It's even better the next day. Wrap tightly with foil if you're not eating it all at once. For reheating, 350°F for 15-20 minutes restores that custard magic. Freezes beautifully too—up to 2 months if you wrap it airtight. I always make two and freeze one for lazy mornings. The crust stays crispy if you reheat it covered, then uncover for the last 2 minutes to brown the top.
Why You'll Love This Recipe
- No-Fuss Crust: I swear by this cold butter-and-flour crust—just mix, press, bake. No rolling pins, no stress, and it turns out flaky every single time.
- Creamy Luxury: That heavy cream and egg combo? It’s like a hug in a pie dish—rich but not heavy, with that perfect set where the center’s still just shy of rubbery.
- Weeknight Hero: Leftovers taste even better the next day, and it’s the kind of dish that feels fancy but costs less than takeout. My lazy Sundays thank me.
- One-Pan Magic: Ham and cheese are the ultimate lazy filler, but this crust makes it feel intentional. Plus, one sheet pan means less cleanup—and more time for coffee.
Step-by-step instructions for basic ham and cheese quiche
Here's how to build a quiche with a buttery, flaky crust and rich, creamy filling every time.
Make the Perfect Pie Crust
In a large bowl, combine the 2.5 cups all-purpose flour and 1 tsp salt. Cut in the 1 cup unsalted butter using a pastry cutter or your fingers until the mixture resembles coarse crumbs with pea-sized butter pieces. Add the 0.5 cup ice water, 1 tablespoon at a time, mixing gently just until the dough comes together. Don't overwork it—handle only enough to form a smooth ball.
Wrap the dough in plastic wrap and flatten into a disk. Chill in the refrigerator for at least 1 hour (up to 2 days). The cold dough is essential for that signature flaky texture. Preheat your oven to 375°F while the dough chills. Roll out the chilled dough between two sheets of parchment paper to 12-inch diameter, then transfer to a 9-inch pie dish, pressing gently into the bottom and up the sides. Trim any excess dough hanging over the edge.
Blind Bake the Crust
Line the crust with parchment paper and fill with pie weights or dried beans. Bake for 15 minutes at 375°F. Remove the weights and bake for another 5 minutes until the edges are just beginning to turn golden. This pre-baking prevents a soggy bottom when you add the filling later. The crust should be firm but not browned—it'll finish baking with the quiche filling.
Watch the oven carefully during this step. If the crust starts browning too quickly, cover the edges with foil. The goal is a fully set crust that can support the custard without collapsing. Let the crust cool for 10 minutes before adding the filling—this prevents cracking when hot ingredients go in.
Prepare the Filling
In a large bowl, whisk together the 5 whole large eggs, 1 cup heavy whipping cream, 0.5 cup milk, 1.5 cups sharp cheddar cheese, 1 cup diced ham, 0.5 tsp black pepper, 0.5 tsp garlic powder, and 0.25 tsp nutmeg until completely smooth. The cheese should be fully dissolved with no lumps—strain if necessary. Season with the remaining 1 tsp salt if needed, tasting the mixture as you go.
Here's the thing—don't skip the straining step if your cheese has any texture. Even small cheese particles can create grainy spots in your custard. The filling should be thick enough to coat the back of a spoon but still pour easily. If it's too thick, whisk in 1-2 tablespoons of milk to reach the right consistency.
Assemble and Bake
Pour the egg mixture into the pre-baked crust, spreading it evenly with a spatula. The filling should come about ½ inch from the top edge of the crust. Place the quiche on the middle rack of your oven and bake at 350°F for 40-45 minutes. You'll know it's done when the center is just set (no longer jiggly) and the top is golden brown with a slight crackly crust.
For the perfect doneness, insert a knife near the center—it should come out clean but slightly moist. If the top browns too quickly, tent loosely with foil after 25 minutes. The quiche continues cooking as it rests, so pull it out when it's just slightly underdone. Let it cool for 10 minutes before slicing—this resting time allows the custard to set completely and makes for cleaner cuts.
Pro Tips For Making Basic Ham And Cheese Quiche
- Preheat That Pan: Slide your quiche dish into a cold oven with the preheated rack—this guarantees an even bake from the start. I learned this the hard way when my crust edges stayed doughy while the center overcooked. Trust me, the extra 10 seconds of patience makes a difference.
- Whisk Eggs Like Mad: Beat those eggs and cream until the mixture is thick and ribbony—no streaks, no lumps. I used to give it a half-hearted stir, and the quiche turned out more like a sad omelet. A full 2 minutes with a fork or whisk changes everything.
- Skip the Overmixing: Once you add the flour to butter for the crust, mix just until it barely comes together—overworking it makes the pastry tough. I was guilty of kneading like I was making pie dough, and the result? A quiche crust that tasted like cardboard.
- Blind-Bake the Crust: Weigh down the crust with pie weights or dried beans for 15 minutes before adding the filling—this prevents a soggy bottom. I know, it’s an extra step, but nothing ruins a quiche faster than a gummy crust. (Yes, even if you’re impatient like me.)
Troubleshooting this dish
Soggy Crust Fix
If your crust turns out soggy instead of flaky, the issue is almost always steam from the filling. Pre-baking the crust (as shown in Step 2) is your first defense—never skip this step.
For extra insurance, brush the baked crust with a thin layer of egg wash (1 egg beaten with 1 tbsp water) before adding the filling. This creates a moisture barrier.
If you're in a hurry, bake the quiche on the lower oven rack for the first 15 minutes to let excess steam escape. 🌡️
Undercooked Center
An undercooked center happens when the quiche isn't baked long enough or the oven isn't hot enough. First, check your oven temperature with an oven thermometer—many home ovens run 25°F cooler than set.
If the center is still jiggly after 45 minutes, tent the quiche with foil and bake for 10-15 more minutes at 325°F to finish gently.
For future quiches, reduce the filling depth to ½ inch or add a sprinkle of breadcrumbs on top before baking to help set the custard faster.
Cracked Top
Cracks usually appear when the quiche filling is too hot when poured into the crust or when the oven temperature fluctuates. Let the filling sit at room temperature for 5-10 minutes before pouring, and avoid opening the oven door during the first 30 minutes of baking.
If cracks form, don't panic—they won't affect taste. For prevention, whisk the egg mixture until completely smooth (no lumps) and ensure the crust has cooled for 10 minutes before adding the filling.
A water bath (placing the pie dish in a larger baking dish with hot water) can also help stabilize the crust.
Cheese Not Melting
If your cheese stays in chunks instead of melting smoothly, it’s likely not sharp enough or the oven temperature wasn’t high enough. Use sharp, aged cheddar (like Cabot or Tillamook) and avoid pre-shredded cheese, which contains anti-caking agents.
To fix a quiche with unmelted cheese, broil it for 1-2 minutes on high, watching closely to avoid burning. For future quiches, bake at 375°F for the first 10 minutes, then reduce to 350°F to ensure even melting.
Stirring the cheese into the egg mixture while it’s still warm (but not hot) also helps it dissolve better. 🧀
Egg Mixture Too Thin
A runny custard usually means the egg mixture was too thin or the quiche wasn’t baked long enough. The filling should coat the back of a spoon but still pour easily—if it’s watery, whisk in 1 extra egg yolk to thicken it.
For future quiches, reduce the milk by 2 tablespoons or add 1 tablespoon cornstarch to the egg mixture. If the custard is already too thin, bake the quiche for 5-10 extra minutes at 350°F to set it.
A slightly thicker filling is easier to work with and less likely to leak during baking.
Burnt Edges
Burnt edges happen when the crust bakes too quickly while the center stays undercooked. To prevent this, cover the crust edges with foil during the first 20 minutes of baking. If the edges brown too fast, lower the oven temperature by 25°F and bake for a longer time.
For an already burnt quiche, slice off the edges (about ½ inch) and serve the rest—it’s still delicious!
To avoid this in the future, use a pie dish with slightly higher sides (like a Ceramic Pie Plate) to give the crust more stability, and rotate the quiche halfway through baking for even heat distribution.
Nutrition facts
Frequently asked questions
Can I make this quiche ahead of time?
This quiche actually tastes better the next day. Store it in an airtight container in the fridge for up to 3 days. For serving, reheat at 350°F for 15-20 minutes covered with foil, then uncover for the last 2 minutes to refresh the crust. It freezes beautifully too—wrap tightly and freeze for up to 2 months.
What if I don't have a pie dish?
No problem! Use a 9-inch oven-safe skillet or even a round cake pan lined with parchment paper. For extra insurance against sticking, brush the bottom with butter first. The baking time remains the same, but check for doneness at 35-40 minutes—the center should be set but still slightly jiggly.
Can I substitute the ham with something else?
Yes! Swap the ham for cooked bacon (crumbled), sausage crumbles, or even mushrooms for a vegetarian version. For bacon, use 4 oz cooked and drained. If using mushrooms, sauté them first with garlic and onions to remove excess moisture. Adjust seasoning to taste after adding your substitute.
Why does my crust get soggy?
Soggy crusts happen when moisture from the filling steams the bottom. The fix? Always pre-bake the crust (as shown in Step 2) and brush it with egg wash before adding filling. If you're in a hurry, bake the quiche on the lower oven rack for the first 15 minutes to let steam escape.
How do I make this gluten-free?
Replace the all-purpose flour with a 1:1 gluten-free flour blend (like Bob's Red Mill) and use 1 extra tablespoon of xanthan gum per cup of flour. For the crust, chill the dough longer (2 hours) and handle it gently. The custard filling remains the same—just whisk well to avoid lumps.