Snacks
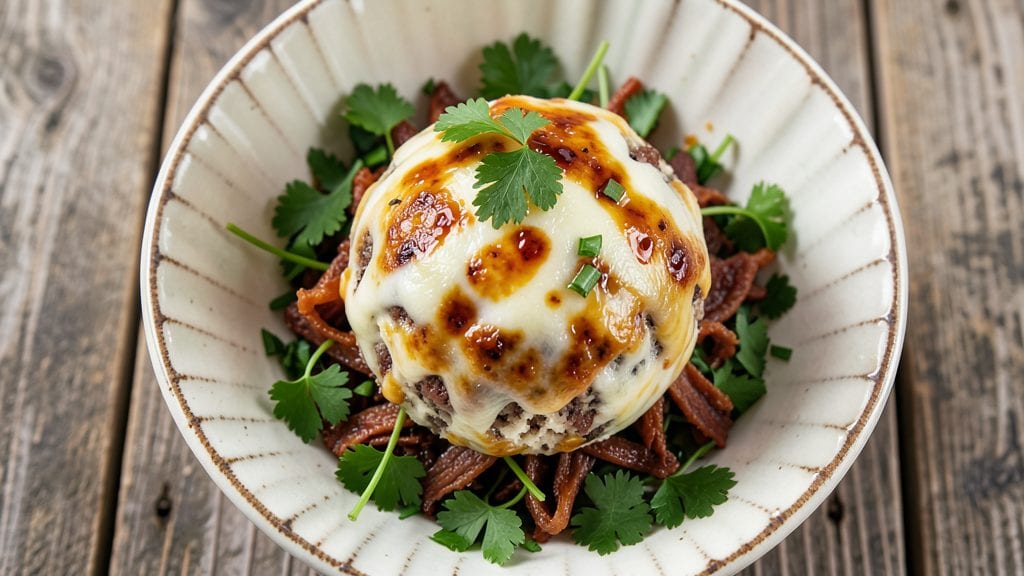
This old-fashioned dried beef cheese ball recipe delivers the ultimate party snack—where creamy cheese meets salty, tender dried beef wrapped in a crunchy herb crown. The pull-apart texture and bold flavors make it a crowd-pleaser, perfect for game day or holiday gatherings.
I’ve perfected the balance between tangy cheese and savory dried beef, ensuring every bite is satisfying and full of character.
The secret lies in the preparation: thinly sliced dried beef adds depth, while sharp cheddar and cream cheese create that signature creamy base. We’ll cover everything—from prepping the dried beef to shaping the ball and chilling it properly for that ideal firmness.
The herb crown isn’t just for looks; it adds a fresh, aromatic crunch that elevates every bite.
By the time you’re done, you’ll have a cheese ball that’s rich, flavorful, and impossible to resist—with a texture that’s both creamy inside and satisfyingly crisp on the outside.
Serve it with crackers, pretzels, or your favorite dips for the ultimate snack experience. Let’s get started on this classic recipe with a modern twist.
This dish is more than just a snack; it’s a conversation starter. The combination of dried beef’s tangy richness and the herb crown’s freshness creates a balance that’s hard to match. Whether you’re hosting a party or just craving a savory bite, this cheese ball delivers restaurant-quality results at home.
Ingredients for old fashioned dried beef cheese ball
Creamy, tangy, and packed with salty dried beef—this cheese ball is a game-day winner!
| Ingredient | Amount | Notes |
|---|---|---|
| Sharp Cheddar Cheese 🧀 | 16 oz | Aged 2+ years for tangy flavor |
| Cream Cheese 🧈 | 8 oz | Full-fat for best texture |
| Dried Beef 🥩 | 6 oz | Thinly sliced, high-quality |
| Butter 🧈 | 4 tbsp | Unsalted, softened for mixing |
| Worcestershire Sauce 🍯 | 1 tbsp | For umami depth |
| Fresh Parsley 🌿 | ¼ cup | Finely chopped for herb crown |
| Fresh Chives 🌿 | 0.15 cup | Finely chopped for herb crown |
| Almond Flakes 🥜 | ½ cup | Toasted for crunchy crown |
| Parmesan Cheese 🧀 | ¼ cup | Freshly grated for crown |
| Garlic Powder 🧄 | ½ tsp | Enhances dried beef flavor |
| Onion Powder 🧅 | ½ tsp | Adds savory base |
| Black Pepper 🌶️ | ¼ tsp | Freshly cracked for heat |
| Salt 🧂 | ½ tsp | Kosher salt for seasoning |
| Crackers 🍞 | 24 whole | For serving (optional) |
The dried beef is the star, so pick high-quality slices—none of that flimsy stuff. Costco or specialty delis usually carry the best, but check the meat section at Whole Foods if you're in a hurry. Thinly sliced means more surface area for flavor, so if yours isn't pre-sliced, ask the butcher to slice it paper-thin. The sharp cheddar? Cabot or Tillamook are my go-tos—they've got that perfect tang. And don't even think about skipping the Worcestershire—it's what ties everything together. (Trust me, I've tried it without.)
No dried beef? Salami or prosciutto in a pinch, but it won't be the same—dried beef's unique tang is irreplaceable. Fresh herbs wilt fast, so chop them right before mixing the crown. No fresh parsley? Dried works at half the amount, but it won't have that same bright pop. The almond flakes can be swapped for crushed potato chips if you're feeling lazy—just toast them first for crunch. And if you're making this ahead, prep the herb crown separately and mix it in right before serving so it stays fresh.
This keeps for 3-4 days in the fridge, but honestly, it's better the next day when all the flavors meld. Wrap tightly in parchment and store in an airtight container to keep that crispy crown. For parties, I like to make it a day ahead so the flavors have time to develop. The crackers? Ritz or water crackers are perfect—they hold up to the creamy goodness without getting soggy. Serve at room temperature for the best texture.
Why You'll Love This Recipe
- Here’s what sold me: the dried beef’s salty, chewy bite cutting through the sharp cheddar while the Worcestershire adds this deep, savory punch. It’s like a grown-up version of crackers and cheese—with a little bite that lingers.
- No-Fuss Mixing: I swear by this recipe—just pulse the cheddar, cream cheese, and dried beef in a food processor until it sticks together like wet sand. No measuring cups, no stress, and honestly? That Worcestershire glaze ties everything into one cohesive, tangy hug.
- Umami Bomb: Here’s what sold me: the dried beef’s salty, chewy bite cutting through the sharp cheddar while the Worcestershire adds this deep, savory punch. It’s like a grown-up version of crackers and cheese—with a little bite that lingers.
- Party-Ready Magic: Between us, this cheese ball is my secret weapon for game day, potlucks, or even a lazy Sunday with friends. Serve it with toothpicks or crackers, and suddenly you’re the host who brought the real snack. (Yes, even on a Tuesday night.)
Step-by-step instructions for old fashioned dried beef cheese ball
Here's how to assemble this legendary party appetizer with perfect texture and bold flavors.
Mix the Cheese Base Until Silky
In a large mixing bowl, combine the 16 oz sharp cheddar cheese and 8 oz cream cheese. I like to use my hands for this part—it's faster and helps break up any large chunks of cheese. Let the cheeses sit at room temperature for 10 minutes to soften slightly, which makes mixing easier.
Add the 4 tbsp softened butter and 1 tbsp Worcestershire sauce to the bowl. Use a wooden spoon or silicone spatula to mix everything together until completely smooth and uniform in color. The mixture should be creamy but still hold its shape when pressed—this ensures the cheese ball will stay together. If it feels too sticky, let it sit for another 5 minutes to firm up slightly.
Fold in the Dried Beef and Seasonings
Gently fold in the 6 oz dried beef using your hands or a spatula. Be careful not to overmix—just distribute it evenly throughout the cheese. The dried beef should be finely chopped if possible, but even if it's in larger pieces, it'll still add that incredible savory punch.
In a small bowl, whisk together the 0.5 tsp garlic powder, 0.5 tsp onion powder, 0.25 tsp black pepper, and 0.5 tsp salt. Sprinkle this seasoning blend over the cheese mixture and fold it in completely. The dried beef already has salt, so taste the mixture before proceeding—you might not need the full 0.5 tsp salt if your dried beef is well-seasoned.
Shape and Chill the Cheese Ball
Scoop the cheese mixture into a ball shape using your hands, packing it firmly but not too tightly. Place it on a plate lined with parchment paper and smooth out any rough edges. For an extra-smooth finish, wet your hands slightly with water and gently pat the surface.
Cover the cheese ball loosely with plastic wrap and refrigerate for at least 2 hours or up to 24 hours. This chilling time is crucial—it allows the flavors to meld together and the cheese to firm up enough to hold its shape when you add the crown. The longer it chills, the more pronounced the flavors will be.
Prepare the Herb-Almond Crown
In a small bowl, combine the 0.5 cup almond flakes, 0.25 cup freshly grated parmesan cheese, 0.25 cup finely chopped fresh parsley, and 0.15 cup finely chopped fresh chives. Mix well to distribute the herbs evenly. This combination gives you the perfect balance of crunch, saltiness, and freshness that makes this cheese ball legendary.
Remove the cheese ball from the refrigerator and carefully press the herb-almond mixture onto the surface, covering it completely. Use your hands to pat it gently but firmly so the mixture sticks well. For extra adhesion, you can lightly mist the cheese ball with water before adding the crown mixture.
Serve with Crackers for Maximum Enjoyment
Return the crowned cheese ball to the refrigerator for 30 minutes to allow the crown to set slightly. This final chilling helps everything hold together beautifully. When ready to serve, use a sharp knife to cut the cheese ball into wedges—it should pull apart cleanly with a satisfying resistance.
Serve immediately with the 24 whole crackers for dipping. The contrast of the creamy, tangy cheese ball with the crunchy crown and buttery crackers makes every bite incredible. This appetizer is perfect for parties, game days, or anytime you want to impress your guests with a classic crowd-pleaser!
Pro Tips For Making Old Fashioned Dried Beef Cheese Ball
- Chop Dried Beef Fine: I learned this the hard way—using dried beef straight from the jar means grainy, unpleasant textures. Pulse it in a food processor until it’s almost like confetti, then pulse the sharp cheddar and cream cheese together. This ensures a smooth, cohesive mix that holds shape and melts evenly.
- Warm Cheeses First: Cold cream cheese and sharp cheddar resist blending, leading to lumps. Microwave the cream cheese for 10 seconds, then cut the cheddar into small cubes—this makes mixing a breeze. Warm cheeses also help the Worcestershire sauce distribute evenly, giving that classic tangy depth.
- Don’t Overmix the Dough: After combining everything, mix just until the dried beef is evenly distributed. Overworking the cheese ball makes it dense and rubbery—like a sad, greasy hockey puck. Stop when it’s loose but holds together; the butter and Worcestershire will bind it as it chills.
- Roll in Butter, Not Oil: Skip the oil—this isn’t fried chicken. Roll the cheese ball in softened butter before coating it in dried beef bits. The butter adds richness and helps the dried beef stick, while oil just makes the exterior greasy and slippery. (Yes, even if you’re impatient like me.)
Essential equipment for this recipe
Essential Mixing Tools
You’ll need a large mixing bowl with at least 8-quart capacity to handle the cheese and dried beef comfortably. I recommend a stainless steel bowl from OXO Good Grips—it’s non-reactive and easy to clean. For mixing, use a wooden spoon or silicone spatula to avoid scratching bowls.
If you’re using your hands (which I do for best texture), keep a small bowl of ice water nearby to rinse between kneading sessions. 🧑🍳
Cheese Shaping Tools
A parchment-lined plate is non-negotiable for shaping—it prevents sticking and makes cleanup effortless. For a smooth finish, wet your hands slightly with water and gently pat the cheese ball.
If you’re nervous about shaping by hand, a small silicone ice cube mold (like Kitchy’s) can help create a perfect round base before adding the crown. 🧀
Herb Crown Prep
Fresh herbs need sharp knives! Use a high-quality chef’s knife (like Wüsthof’s 8-inch) and a cutting board (I love Teakha’s bamboo boards for grip). For almond flakes, toast them in a small skillet over medium heat for 2-3 minutes until fragrant—this enhances their crunch.
A fine-mesh sieve helps distribute the herbs evenly over the cheese ball. 🌿
Chilling Essentials
An airtight container (like Rubbermaid Brilliance) keeps the cheese ball fresh during chilling. For the final 30-minute set, I place mine on a wire rack in the fridge to prevent condensation from softening the crown.
If you’re making this ahead, parchment paper between layers prevents sticking when stacking. ❄️
Serving Presentation
A large platter (I use Le Creuset’s stoneware) elevates the dish for parties. For cutting, a sharp serrated knife (like Victorinox’s 8-inch) ensures clean slices. Serve with crackers on a tiered tray (like West Elm’s ceramic) for a restaurant-worthy spread. 🍽️
Optional Pro Upgrades
For a food processor, the Cuisinart DLC-2AC blends the cheese base smoothly in 30 seconds. A mandoline (like Benedict’s) slices dried beef uniformly if you’re not using pre-sliced. For extra flair, a pastry brush helps mist the crown with water for adhesion. 💡
Nutrition facts
Frequently asked questions
Why does dried beef make this cheese ball different from traditional ones?
The dried beef adds a deep, salty umami flavor that traditional cheese balls with just cheese and herbs can't match. Its tender yet firm texture contrasts beautifully with the creamy cheese, creating layers of satisfaction in every bite. The Worcestershire sauce enhances this richness, making it a standout appetizer.
Can I make this cheese ball ahead of time?
This recipe actually benefits from being made a day ahead. The flavors meld beautifully during chilling, and the herb crown stays fresher longer. Just store it in an airtight container in the fridge, and let it sit at room temperature for 30 minutes before serving to restore the perfect texture.
What's the best way to prevent the herb crown from falling off?
Lightly mist the cheese ball with water before pressing on the herb-almond mixture. This creates a gentle adhesive that helps the crown stick better. Also, chill the cheese ball for the full 2 hours before adding the crown—it needs to be firm enough to hold the topping securely.
Can I substitute the dried beef with something else?
While dried beef gives this dish its signature flavor, you can use salami or prosciutto in a pinch. However, these won't provide the same tangy depth. If you're avoiding meat, try finely chopped sun-dried tomatoes for a vegetarian version, though the texture will be different.
How do I get the perfect pull-apart texture?
The key is proper chilling! Let the cheese ball firm up completely in the fridge for at least 2 hours before adding the crown. When ready to serve, cut with a sharp knife—it should pull apart cleanly with a satisfying resistance. If it's too soft, return it to the fridge for another 30 minutes.